

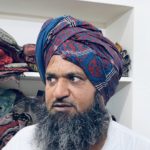
Ajrakh’s web of connections
It takes a village to raise a child, goes the old saying. Well, it takes a village to make Ajrakh as well.
Using wood blocks to create designs on fabric is a technique that goes back centuries. Ajrakh belongs to this class of crafts. It originated in Sindh and came into Gujarat.

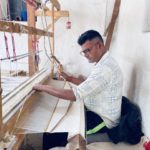
Step 1: Let us begin with the wood blocks. Ajrakh block carving is itself a highly specialised craft. Today there are just a few Ajrakh block carvers in Pethapur, Gandhinagar, Gujarat. The wood that is most suitable comes from local indigenous trees such as babur (Acacia farnesiana), keekar (Acacia arabica) and sisham (Dalbergia sisso). The main trunk of the tree is cut into square blocks of a particular size. Then comes the carving of the design. Negative areas are skilfully carved out to make a wood block that is used for printing.
Step 2: Saaj. The cotton cloth is torn, traditionally by hand, into lengths that are specific and suitable for use. This cloth is soaked overnight in a mixture of soda, castor oil, water and animal dung (cow, camel or goat) to dislodge the starch. The next day, the fabric is watched in running water. The fabric is beaten with a mallet until it is cleaned of starch and other impurities.
Step 3: Kasanu: The next step is to dip the fabric in myrobalan (harda) solution. This prepares the fabric to absorb colour. The solution is made by mixing dry myrobalan powder with castor oil and water.
Step 4: Kiryana: The outlines are drawn. A mixture of gum arabic with lime and water is made into a thick paste. This lime is the main resist with whitening powder, which helps ensure a smooth texture without any cracks and makes the surface impermeable. The same pattern is repeated on the other side of the fabric if the Ajrakh needs to be a double sided one.
Step 5: Kat: Iron acetate is used for the black patterns. It is made by fermenting iron scrap with water, gram flour or besan and molasses for 10 days. This is boiled further to make a thick emulsion by adding tamarind powder and edible oil. This gives a dark black colour. Alum is added to get a greyish tone. If the background of the fabric has black colour, it is painted black using a brush instead of printing the background with blocks.
Step 6: Pah: A mixture of tamarind seeds, alum and water is boiled to make the printing paste red in colour. Since alum is colourless, usually some red colour is mixed in so that the colour is visible and the blocks can be properly aligned. This red colour will wash out. The printed area/alum will develop red colour when the fabric is boiled in alizerine or madder.
Step 7: Gachh: Millet flour is mixed with water and boiled till it becomes a paste. This paste is then mixed with fuller’s earth or clay, alum and molasses until all the ingredients are thoroughly dissolved. This thick paste is spread over the fabric and ground cow dung or ground saw dust is sprinkled immediately over it. The fabric is dried under the sun for a few hours. Areas which need to be resisted from the next process of indigo dyeing are printed with this resist paste.
Step 8: Bodaw: The Indigo vat is a deep earthenware pot sunk into the ground. Indigo, lime, soda and dates are the ingredients for making indigo dye. The fabric is carefully pleated and dipped in the vat in parts. The folds are slightly opened to ensure even dyeing. The fabric is taken out, slightly squeezed and spread under the sun. Oxidation takes place in about 20 minutes. The fabric is then folded and rolled into a large bundle ready to be washed the next morning.
Step 9: After indigo dyeing, the fabric is washed to degum the resist print. This will remove the excess indigo, clay, sawdust and other colouring materials which may not have penetrated the fabric’s fibre. The fabric is thoroughly washed in running water and laid flat to dry in the sun.
Step 10: Rang: A solution of alizerine (madder), alum and water is boiled in a large container. The fabric is dipped into this boiling solution along with dhawai phool or Woodfordia fruiticosa. The fabric is boiled in the solution until the desired red colour is achieved. Then the fabric is washed, squeezed and dried in the sun.
Step 11: Minakari: To achieve two shades or darker shades of indigo and read, a process called Minakari is followed. This literally means repeating the work So that the earlier steps are repeated to make the shade darker.
Thanks to Abduljabbar Mohammad Khatri for explaining and providing this content.
